HG Prefab foldable expandable container homes — built to last, delivered worldwide.
Assembly day is the shortest phase of a folding container house project and the one buyers watch most closely, because it is the only part that happens on their own ground. The difficult work is already done: frame, insulation, wiring, glazing and interior finishes were installed indoors, then the building was folded to transport width and locked for the journey. What happens on site is a sequence of mechanical operations — lift, place, unfold, level, anchor, seal, connect — and none of it requires specialist trade skills if the site was prepared properly. This article walks through that day hour by hour for a 40FT expandable unit and flags the mistakes that turn a two-hour unfold into a two-day problem.
HG Prefab factory prices for the folding unit itself are 20FT $7,200–$9,800; 30FT $10,500–$14,500; 40FT $12,500–$16,500, ex-works and before freight, taxes and site work. The 40FT model is what most assembly-day planning is written around, because it has the widest fold-out panels and the most hinge work. If you have not chosen a size yet, start with the guide to foldable container homes, then compare layouts on the products page.
Before the Truck Arrives
Almost every bad assembly day was decided a week earlier. The unit unfolds quickly; what slows the day down — soft ground, a pad out of level, a blocked lane — is a pre-planning failure.
Site Prep Recap
The pad is the most important element. A folded 40FT unit is a heavy steel box that transfers its load through a few contact points, and those points need a surface that will not settle or tilt. A reinforced slab, a compacted gravel pad with a perimeter beam, or concrete piers under the corner castings and fold-out wall feet all work, provided bearing capacity suits the soil. On soft ground, piers carried to competent material usually cost less than over-excavating.
Beyond the pad, confirm the access width and turning radius for the delivery vehicle, overhead clearance along the route, the position of the service stubs and the setbacks on your lot. Drainage matters as much as structure — water must run away from the unit, not beneath it. The full sequence is set out in our site preparation checklist.
Pads, Access and Crane Position
Decide where the lifting equipment will stand before the truck is dispatched. A mobile crane needs firm ground for its outriggers and clear space for the counterweight; a forklift needs a compacted run to the pad. Measure the route rather than estimating it — low utility drops, tree canopies and gate widths are the items that most often force a second mobilisation. If the crane reaches over the pad, the operator needs the unit weight and lift radius; confirm both at order time.
Crew and Tools Checklist
The crew is small: four workers unfold, level and anchor, and the lifting equipment brings its own licensed operator. One of the four should be the lead, and the lead is the only person giving instructions to the crane operator. The tool list is basic, but a missing item still stops the job.
| Item | Qty | Provided by | Purpose |
|---|---|---|---|
| Workers (assembly crew) | 4 | Owner | Unfold, level, anchor, seal |
| Mobile crane or heavy forklift with operator | 1 | Local hire | Offload the folded unit |
| Cordless impact driver with socket set | 2 | Owner | Roof, wall and latch bolts |
| Torque wrench (specified range) | 1 | Owner | Final hinge bolt torque |
| Spanners, pry bar, rubber mallet | 1 set | Owner | Align panels, seat pins |
| Long spirit level or laser level | 1 | Owner | Frame level, both directions |
| Steel or composite shims | 1 pack | Owner | Levelling under castings and wall feet |
| Sealant gun and specified joint sealant | 6–8 cartridges | Owner / factory kit | Seal fold joints and roof seam |
| Ladders (A-frame and extension) | 2 | Owner | Roof and latch access |
| PPE: gloves, eye protection, boots | 4 sets | Owner | Site safety |
| Hinge pins, bolts, latches and spares | 1 kit | HG Prefab | Structural panel connection |
| Anchor kit (per foundation design) | 1 kit | HG Prefab / local | Fix unit against wind uplift |
Delivery and Offloading
The 40FT unit arrives folded: side walls, roof panel and end walls are stowed inside the transport envelope and locked with transport brackets. On arrival, inspect the exterior and the locks for damage before anything is lifted, photograph anything questionable, and only then let the driver position for the lift.
Yes — a crane or forklift is required to offload the folded unit from the truck. Once it is set in position, four workers can unfold and assemble the main structure in about 2 hours. That sentence is the most useful thing to tell a crane company and an inspector, because it separates the two halves of the day: the lift is a machinery operation with its own cost and lead time, while the unfold depends entirely on the pad.
Set the unit down in its final position in one movement if possible. Dragging a folded unit across a pad risks twisting the frame, and a twisted frame will not let the fold panels seat. Aim to land within a few millimetres of level in both directions; shims correct the rest, but they are a correction, not a substitute for a flat pad.
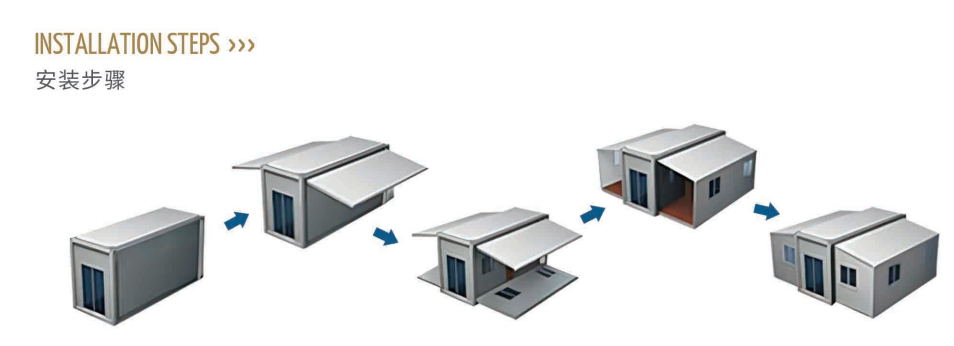
Unfolding the Main Structure Step by Step
Work in the factory sequence rather than improvising: each movement exposes the next fixing point, and skipping ahead usually means a panel has to be brought back in before it can be bolted.
Step 1: Release the Transport Locks and Raise the Roof
Remove the transport brackets and pins holding the folded stack, and keep them — they are reused if the unit is relocated. The roof panel is raised first, by crane, by integrated lifting points with a prop, or by the built-in gas-assist arrangement depending on the model; the correct method is in the shipped assembly manual. Two workers guide the panel while a third controls the lift. Do not release the lifting equipment until the roof is mechanically secured, not merely resting.
Step 2: Fold Out the Side Walls
With the roof supported, the wall panels swing outward and down from their stowed position. It is a two-person job per panel: one worker controls the swing while the other watches the hinge line and floor track. The panels are heavy but counterbalanced by the hinge geometry, so the movement should be steady, not forced. If a panel resists, stop and look for an obstruction or a twisted frame rather than pulling harder. Brace each wall before moving to the next.
Step 3: Hinge Pins, Latches and Final Torque
Every hinge axis takes its pin, and every pin its clip or nut. Fit all pins loosely, then tighten them in sequence so the structure settles into its geometry before anything locks. Only then apply the specified torque; over-torquing distorts the bushings and can make a later refold stiff. The perimeter latches are adjusted last, then checked by closing a door and window on each fold side to confirm they operate without binding.
Leveling, Anchoring and Sealing
Levelling comes before anchoring, and anchoring before sealing. Reverse that order and you will be cracking fresh sealant to correct a base that moved.
- Level: check the frame in both directions with the spirit level or laser and shim under the corner castings and fold-out wall feet. Re-check door operation afterwards — a door that swings on its own means the frame is still out of level.
- Anchor: install the anchor kit at every designated point. Anchoring is not optional on an exposed site: the building is light for its size once opened out, and wind uplift acts on a large roof area. Use the anchor type specified for your foundation.
- Seal: run the specified sealant along the roof seam and down every fold joint. Pay attention to the junction where the fold-out floor meets the fixed floor; it is the joint most walked on and most likely to leak.
- Verify: walk the perimeter looking for daylight at any joint. Daylight is a leak. Close it before fit-out begins.
Utility Hookups
Services are the part of assembly day that depends on other people. Your crew can open the shell, but electrical, water and gas connections should be made by licensed local trades, because most inspections require it and the warranty depends on it.
Prepare the stubs in advance so they wait where the unit lands. Electrical arrives at the pre-fitted consumer unit or an agreed blank panel, and the service size must match what was specified — a mismatch is the most common cause of a failed first inspection. Water connects at the inlet with a shut-off valve and, in freezing climates, an insulated run. Wastewater leaves through the pre-fitted outlet to the site connection or a holding tank. Each service is brought to a single labelled termination point; the detail for every system, including pipe routes, venting, cable sizing and freeze protection, is in our plumbing and electrical guide.
Test as you go: energise and check each circuit, run water through every fixture and watch the joints, then close up access panels.
Interior Fit-Out and Handover
Because the unit left the factory finished, fit-out on site is short: refit anything removed for transport, confirm doors, windows and cabinets operate, and check for finishes damaged in transit. Loose furniture and appliances ship separately or inside the folded volume.
Do the handover walkthrough with a written list: fold joints sealed, every hinge pin fitted and retained, all anchors installed, doors and windows operating freely, every circuit and fixture tested, water running and draining without leaks, and the assembly manual plus spare fasteners handed over. Photograph the unit and the anchor points for your records.
Assembly-Day Timeline
The table below is a realistic schedule for a 40FT unit on a prepared pad with services stubbed and the crane booked. Difficult access or a pad needing correction will extend it; the structural part rarely slips.
| Time | Phase | Who | What happens | Watch out |
|---|---|---|---|---|
| Hour 0:00–0:30 | Arrival and inspection | Lead, driver | Truck positions; exterior and transport locks inspected | Release driver only after the damage check |
| Hour 0:30–1:00 | Rigging and lift setup | Operator, crew | Outriggers set, slings attached, lift radius confirmed | Ground bearing under outriggers |
| Hour 1:00–1:30 | Offload and set down | Operator, crew | Folded unit lifted off and placed on the pad | Land level; never skid the unit |
| Hour 1:30–2:00 | Locks released, roof raised | 4 workers | Brackets removed and stored; roof raised and supported | Pin the roof before releasing the lift |
| Hour 2:00–2:45 | Side walls folded out | 4 workers | Fold-out panels swung to final position and braced | Stop if a panel resists |
| Hour 2:45–3:00 | Hinge pins and latches | 4 workers | Pins fitted loosely, then torqued in sequence; latches adjusted | Do not over-torque bushings |
| Hour 3:00–3:45 | Levelling and anchoring | 4 workers | Frame shimmed level; anchor kit installed at all points | Re-check door swing after levelling |
| Hour 3:45–4:15 | Sealing the shell | 2 workers | Roof seam and fold joints sealed; perimeter checked for daylight | Seal only after levelling is finished |
| Hour 4:15–5:30 | Utility hookups | Licensed trades | Electrical, water, waste and gas connections made and tested | Service size must match the specification |
| Hour 5:30–6:30 | Fit-out and handover | Lead, owner | Packing removed, fixtures checked, handover list signed | Photograph anchors and seals |
Common Assembly-Day Mistakes
- Booking the crane after the truck. Lifting equipment has its own lead time; confirm it when the delivery date is set.
- Assuming the access route fits. A 40FT vehicle needs width, height and a turning circle. Measure the lane, gate and overhead lines rather than judging by eye.
- Pouring the pad late. Concrete needs time to cure before it carries the unit; a pad poured the day before delivery is not at design strength.
- Under-estimating ground bearing. Outrigger loads and the unit's own contact pressures concentrate into small areas. Soft soil under an outrigger is the most dangerous condition on site.
- Torquing as you go. Fit every pin loosely, let the structure find its geometry, then torque in sequence; random order locks in misalignment.
- Sealing before levelling. A later correction cracks the fresh bead, and a cracked bead at the fold joint leaks in the first heavy rain.
- Skipping anchor points. Wind uplift on a wide, light roof is not theoretical. Every anchor gets installed.
- Unlicensed service connections. It risks the inspection, the insurance and the warranty, and it is the one task to always subcontract locally.
Planning an assembly day?
HG Prefab, manufactured by Henan Huangang Machinery Equipment Co., Ltd., builds 20FT, 30FT and 40FT folding expandable container houses supplied with hinge pins, bolts, latches, anchor kits and a step-by-step assembly manual. Send your site photos and foundation type for an assembly-day plan and a crane sizing note. Email hgmechequip@gmail.com or WhatsApp +86 191 0388 7380. See the 40FT folding expandable model, or browse the products page.
Browse modelsFrequently Asked Questions
How long does it take to unfold a 40FT expandable container house?
Once the folded unit is set down on a prepared pad, four workers can unfold and assemble the main structure in about 2 hours. The remaining assembly-day time goes into leveling, anchoring, sealing the joints and connecting services, so a realistic full day runs from crane arrival to a walkable, weather-tight shell.
Do I need a crane to unload the unit?
Yes. The folded unit arrives as a single heavy steel box on a flatbed or container chassis and must be lifted off with a mobile crane, or with a forklift of adequate capacity where the site and the carrier allow it. Book the lifting equipment before the truck is dispatched, and check ground bearing, overhead clearance and access width in advance.
What tools and crew does assembly day require?
Plan on four workers plus a licensed crane or forklift operator. The hand tool list is short: a cordless impact driver with sockets, spanners and a torque wrench, a long spirit level or laser level, shims and packers, a rubber mallet, a sealant gun with the specified sealant, ladders, gloves, eye protection and a first aid kit. The manufacturer supplies the hinge pins, bolts and latches with the unit.
Can the unit be folded and moved again later?
Yes. The hinge and latch system is designed for repeated cycles, and a 40FT expandable container house can be folded back to its transport width, reloaded and relocated. Before moving it, disconnect and cap all services, drain the plumbing, remove or secure loose interior items, and reverse the anchoring and sealing sequence so the fold panels are free to move.